Entries by chadz

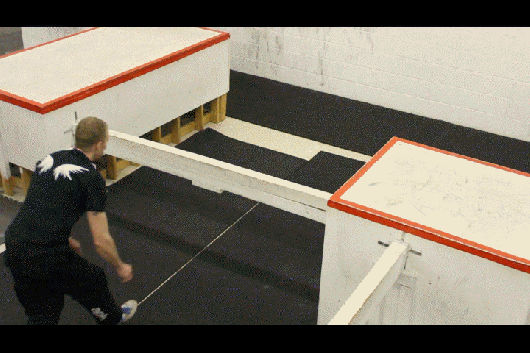
Trapezoid/Vault Box Construction Guide

 
2.PNG

Depending on how big you want your parkour vault box, it will change the amount of wood you will need.

For a 3 foot tall vault box you will need:

  • 6 8ft 2x4s
  • Two sheets of ¾” 4’x8’ plywood
  • 32 truss connector plates
  • Construction grade polyurethane
  • Bunch of nails or wood screws (T-25 star bit recommended)

Tools:

  • Nail gun/hammer or power drill for screws
  • Circular saw
  • Caulking gun
  • Power sander
  • Pencil


Getting Started


Vault Box For Parkour


Start by laying two 2x4s fat side down next to each other at equal and opposite angles.

Parkour Vault Box


Next, to find the cutting angle, lay two more 2x4s parallel to each other. This is where you will decide how tall and wide you want your parkour vault box to be.

First decide how wide you want the top to be. This will be measured from the outside of the top green 2×4.

How tall you want the vault box to be is decided by the lower green 2×4. As long as the two green 2x4s are parallel, the angles won’t change.

5.PNG


Using the 2x4s as a guide, mark cutting lines on the wood. Mark the RED lines on the pink 2×4 and the GREEN lines on the lime 2×4.

Parkour Vault Box


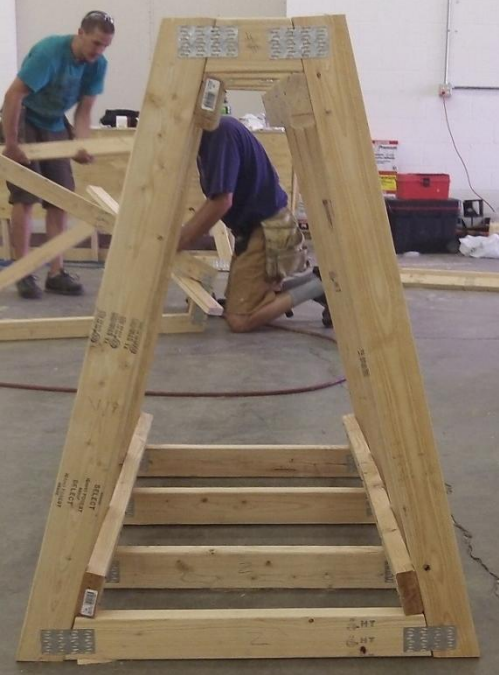
After the pieces are cut, they should fit together like this figure.

Vault Box For Parkour


Next, attach the wood together with truss connector plates. Attach to the spot indicated by the orange. Put connector plates on both sides of your frame to have a total of eight plates per frame.


Once you have four frames completed, you can put them together. Using a 2×4, evenly space the frames so they are 12” on center (ie, measuring from the center of one board to the center of the other board) so the width is 4’ (a normal piece of plywood is 4’, less cutting).

Do this on all four angles inside the vault box so the finished product looks like that.

When you are assembling the vault box, try to make the frames as straight as possible. They should be 90 degrees to the ground.

Parkour Vault Box

HERE ARE A FEW PICTURES OF OUR VAULT BOX SKELETON FULLY ASSEMBLED:

Parkour Obstacle


Next comes the plywood. To attach the plywood you can either screw it or glue and nail it. We glued and nailed ours using construction grade polyurethane. This has so far worked wonderfully and was much faster than screwing.

NOTES ABOUT PLYWOOD:

Parkour Vault Box Orientation


Depending on the thickness of the plywood, you may have to pay attention to the grain. We used ½” plywood which consists of three layers. Because of this, you need to layer the grain perpendicular to your frame. If you use ¾” (recommended) then this shouldn’t be a problem.

Parkour Obstacles


Next, layering the plywood. The top piece should lay on top of the side pieces. This will help protect the sides of the plywood. If you’d like, you can sand the corners of the top piece so it is flush to the side. This, of course, is optional.

DING!

Parkour Vault Boxes

20 Basic Vaults for Parkour & Freerunning

This post is primarily about static flow using a single, short, thin obstacle to vault.  Very much less so about parkour style overcoming an obstacle and continuing motion.

Teaching for over 10 years at my Parkour gym in Minneapolis has lead me really analyze how we teach vaulting in our Parkour classes.  I have been working on a theory/concept of vault flow for parkour and freerunning (think stuff like this video here).  What I’ve been trying to do is systematically break down the vaulting technique of parkour and freerunning into it’s simplest form so I could exhaustively practice every possible way to overcome a typical vault style obstacle.  These ideas have been constantly evolving throughout the years to include more things or become easier to understand.

Speed Vault

To do a speed vault; you will first jump off of your left leg, put your left hand on the obstacle as you clear it, and land on your left leg to step out.  You could also do the same vault using your right leg to jump off, your right hand on the obstacle, and land on your right leg.  (This is also called a “Safety Vault” or “Step Vault” if you use your leg to help you over.)  These would both be considered speed vaults, but are very different in a movement sense and you should definitely practice both of them.

Chad demonstrates speed vault parkour gym minneapolis

Chad demonstrates speed vault parkour gym minneapolis


Lazy Vault

To do a lazy vault; you will first jump off with your right leg, put your left hand on the obstacle as you clear it, and land on your left leg.  You can also do this on the other side by jumping off with your left leg, putting your right hand on the obstacle, and landing and your right leg.  Again, these are different movements and should both be practiced.  Now, if we compare the Speed Vault and the Lazy Vault we can see the only difference is the leg that you first jump off of.  Other than that, the vaults are identical from an analytical standpoint.

Chad demonstrates lazy vault parkour gym minneapolis

Chad demonstrates lazy vault parkour gym minneapolis

These are the first four vaults in our system and you can start to see why there are some of these differences.  The vaults themselves are very similar, however their uses are very different because of the way your body is positioned.  Because of the way the take-off works, a speed vault tends to work best if you are coming straight at your obstacle, and running straight away from the obstacle. Alternatively, a lazy vault tends to work best if you are coming at your obstacle from an angle, and running away at a similar angle.

Chad demonstrates speed vault parkour gym minneapolis

Chad demonstrates lazy vault parkour gym minneapolis


Thief Vault

Alright, so we’ve talked about the differences of your jumping leg and the differences of the hand you place on the obstacle.  Now it’s time to talk about the landing leg.  We’ll start by taking a speed vault, but landing on the other leg.  We call this a Thief Vault.  To do a thief vault; first start by jumping off of your left leg, putting your left hand on the obstacle and landing on your right leg.  Once again you can switch to the other side by jumping off of your right leg, putting your right hand on the obstacle and landing on your left leg.  To go back to talking about the vaulting angles again, the thief vault will tend to come into the vault at an angle, and run out straight so it makes a 90 degree turn.

Chad demonstrates thief vault parkour gym minneapolis

Chad demonstrates thief vault parkour gym minneapolis

Chad demonstrates thief vault parkour gym minneapolis


Lazy Turn Vault

Finally, we can start with the lazy vault and land on the opposite leg — a Lazy Turn Vault.  To do a lazy turn vault;  you will start by jumping off of your left leg, putting your right hand on the obstacle, and landing on your left leg.  Also on the other side by jumping off of you right leg, putting your left hand on the obstacle, and landing on your right leg.  So far we have not found any practical purpose for this vault in a parkour sense.  However, we think it’s one of those things that since you can do it, you may as well practice it just in case that purpose is found eventually.  There are some uses for this vault in more of a freerunning sense, though.

Chad demonstrates lazy turn vault parkour gym minneapolis

Chad demonstrates lazy turn vault parkour gym minneapolis


Reverse Variations

We are now up to 8 different vaults in the system, and we’re going to add a new concept that doubles that number. All of these vaults so far start by kicking a leg forward in front of you and over the obstacle.  You can also do all of these vaults by kicking that leg backwards behind you and over the obstacle.  We call these the “reverse” variations.

Reverse Speed (or reverse safety)

Chad demonstrates reverse speed vault parkour gym minneapolis

Chad demonstrates reverse vault parkour gym minneapolis

Reverse Lazy

Chad demonstrates reverse lazy vault parkour gym minneapolis

Chad demonstrates reverse lazy vault parkour gym minneapolis


Reverse Thief (many of us simply call this the “Reverse Vault”)

Chad demonstrates reverse thief vault parkour gym minneapolis

Chad demonstrates reverse vault parkour gym minneapolis

Reverse Lazy Turn (this one looks and feels almost identical to the speed vault.  There ends up being a little overlap when we break it down this way)

Chad demonstrates reverse lazy turn vault parkour gym minneapolis

Chad demonstrates reverse lazy vault parkour gym minneapolis


Dash Vault

That brings us up to 16 vaults in the system.  So far these seem to be the only ways you can get over a basic obstacle using only one hand (going into the vault).  All other vaults seem to be a variation of these with added twists, flips, turns, feet done together, or anything like that.  However there still is a bit missing.  If you come straight at the obstacle, kicking your feet straight out in front of you, and put both hands down on the obstacle…you have the Dash Vault.  You can do a dash vault by jumping off your left or right leg, and they feel distinctly different.  But no matter how you land it seems to feel pretty much the same, so I only consider the left jump dash and right jump dash to be different.

Chad demonstrates dash vault parkour gym minneapolis

Chad demonstrates dash vault parkour gym minneapolis


Kong Vault

And finally, if you do the reverse variation of the dash vault by kicking your leg backwards as you approach the obstacle, this is called the Kong Vault.  Again, there is a distinct difference between a left and right leg jump at the beginning, but it doesn’t really seem to make much of a difference which leg you land on.  So once again I would consider these two separate vaults.

Chad demonstrates kong vault parkour gym minneapolis

Chad demonstrates kong vault parkour gym minneapolis


And those are the 20 basic vaults for Parkour and Freerunning.  These vaults can all be added to with any sort of extra movements and done in many different situations to make them seem different, but deep down they all seem to come from one of these base vaults.  Play with this system yourself and maybe you’ll find a way to build on it and add more to it.  Or, just play with the originals and come up with new ways of doing all of them!  Also check out my Parkour classes in Minneapolis to learn all of this stuff directly from me!

Martial Arts vs. Parkour

Parkour is often considered a discipline and compared to martial arts in it’s training.  With over 25 years of experience training both disciplines and spending the last 15 years focused on creating the most fun workout in the Twin Cities at my Parkour gym in Edina, I have my own personal thoughts on this…and I figured I’d share 🙂

MY BACKGROUND IN MARTIAL ARTS

As a young kid, I tried a bunch of traditional American sports.  I was in a softball league, I was on a basketball team, I did wrestling for like a week, I went to about four track practices, and I was even on a bowling league.  None of this really clicked with me because I was always a really sickly asthmatic kid with no apparent natural athletic ability and I didn’t enjoy any of it (except bowling because I could just mess around with my friends).  When I was 14, one of my friends invited me to join him in his karate class.  The instructor saw the potential in me and I absolutely loved it.  Not long after that I was spending every day after school for 3-4 hours training at the karate studio.  Things came quickly and I progressed through the ranks pretty fast.  I got my black belt in 2002 and my second degree black belt in 2004.  I kept training after that, but a lot more on my own and never progressed any farther in the belt ranks for personal reasons.

The style I trained in is called simply American Freestyle Karate.  Our Master Instructor had black belts in something like 8 different styles of martial arts including a 6th degree black in Okinawan Karate and a 4th degree black belt in Judo.  He took everything that he knew, and taught us the stuff he liked and he found worked the best.  This included Tae Kwon Do style kicks, Karate blocks and self defenses, Western Boxing punching, Judo takedowns, Jiu Jitsu and Aikido joint locks, and Kali weapons training.  In addition to the required weaponry (Filipino Escrima Stick), I also trained in traditional Japanese sword training and non traditional bo-staff.

I started teaching my first karate students when I was 17, and started teaching my own classes once I got my black belt.  I taught karate pretty much non-stop either with private students or full on classes until just last year.  I’ve now officially retired from martial arts teaching.  I still train sporadically, but really not very consistently or intensely.

MY BACKGROUND IN PARKOUR

It’s hard to pinpoint the exact time that I started training parkour.  In my karate training I did a lot of what we called “Extreme” stuff back in my day (they call it “tricking” now).  Many of these movements are used in freerunning now so maybe that counts.  My first back flip was done when I was 15 in my front yard.  I just decided that I could do it, so I did.  Around 2002, I started watching videos on the internet (the early days of the internet, before Youtube).  When I was watching some of the big teams back then like Team Ryoko from Toronto and Saltomortalez from Prague, they started doing crazy outdoor tricking stuff…so I started doing that too.

My first “parkour” video would have been Russian Climbing by Oleg Vorslav.  This was before Youtube existed and I’m not really sure when or where I first saw it.  But I immediately decided that this is what I needed to do with the rest of my life.  I was training for quite a while before I even realized there were other people in the US that were doing the same thing that I was.  My first big jam was in Madison (not sure what year that was) with Mark Toorock, Travis Graves, Levi Meeuwenburg, and bunch of other awesome people.

Now, years later, I own a parkour gym in Minneapolis and previous member of a major international parkour team.  I love my life!

HISTORY OF MARTIAL ARTS 

Bruce Lee always loved a fun workout in Edina

I’m not going to write a novel about the history of all martial arts here.  If you really want to learn all about that, you can go look it all up for yourselves.  I really only want to point out one key moment in martial arts history.  And that is the contributions of Bruce Lee.  Most of us really look up to Bruce Lee for the extremely inspirational life he lead and the great things he did for martial arts in general.  However, I like to remind people that at the time he was doing all those “great things,” most of the martial arts masters of the time really didn’t like it.  Martial arts at the time were very traditional and there was a very “correct” way to do things.  People did not mix styles or make up their own ways of fighting.  Bruce Lee changed all that by going against tradition and creating his own path.

HISTORY OF PARKOUR

David Belle working on the most fun workout

Again, I’m not going to write a novel here.  Feel free to look everything up yourself.  What I do want to mention has to do with what I’ve noticed as a parallel to the history of martial arts.  Many of the original practitioners of parkour have often brought up the fact that they highly look up to Bruce Lee and what he did.  But for some reason those same people and the ones that follow them closely, insist that we must follow the traditional ways of parkour and we should not be allowed to train in our own ways.  I’ve always thought this was an interesting contradiction…but probably for another blog entirely.

MY TRAINING IN MARTIAL ARTS

Training in any martial art is based in hard work and discipline.  Long hours of practicing techniques over and over until you completely master them and can perform them without thinking or hesitating.  Then, after many techniques have been mastered, you are supposed to forget the techniques themselves and react to situations instantly with no thought or hesitation.  Often practitioners also will supplement their training with rigorous conditioning.  Both body weight conditioning and weight training are often used.

When I was training martial arts, I took a fondness to the high flying, spinning, flipping kicks and tricks.  My thoughts were always that if I could teach my body to do those sort of things, I would have an even easier time with the basic techniques.  Also my basics needed to be absolutely perfect to be able to perform those techniques in the first place.  It was well known that none of those things would ever be useful in a real world self defense situation, but I was pretty sure I would never be in a situation like that.  And the only times I ever have been in a situation like that, those basics I trained so hard worked very well.

MY TRAINING IN PARKOUR

Training in parkour is based in hard work and discipline.  Long hours of practicing techniques over and over until you completely master them and can perform them without thinking or hesitating.  Then, after many techniques have been mastered, you are supposed to forget the techniques themselves and react to situations instantly with no thought or hesitation.  Often practitioners also will supplement their training with rigorous conditioning.  Both body weight conditioning and weight training are often used.

While I’ve been training parkour, I’ve taken a fondness to the high flying, spinning, flipping tricks.  My thoughts were always that if I could teach my body to do those sort of things, I would have an even easier time with the basic techniques.  Also my basics needed to be absolutely perfect to be able to perform those techniques in the first place.  It was well known that none of those things would ever be useful in a real world situation, but I was pretty sure I would never be in a situation like that.  And the only times I ever have been in a situation like that, those basics I trained so hard worked very well.

Hmmmmmm…sounds a bit familiar doesn’t it?

PHILOSOPHIES OF MARTIAL ARTS VS. PARKOUR

knowledge for the most useful and fun workout in Edina

I believe this is where the big differences are.  While there are some similarities in the philosophies, I want to focus on one very big difference.  While you are training martial arts, you are very thoroughly instructed that you are never actually supposed to use the things you are learning.  Even in a situation where you could use them, you are supposed to be the better person and just walk away.  And if you ever want to know if what you are learning actually works, it’s not like you can just walk up to a random person ad “test out” your martial arts on them.  At least…not legally.

Parkour, on the other hand, teaches us to use what we are learning whenever and wherever possible.  We are taught that at any and every circumstance we should be testing out our limits against every obstacle we can find.  We are supposed to let parkour become so much of us, that there are no more set paths in the world and to see opportunity of movement everywhere we look.  In a situation where we really do need to get somewhere or get away from something, we are absolutely supposed to use what we have learned, and if you want to know if your training works…just run!  You’ll know quick if you are training properly if you just try to run as fast as you can across any set terrain.

THE COMPARISON

This is the reason that I have found parkour to be a superior discipline to martial arts.  Although it requires the same dedication, hard work, and training; if we find ourselves in a real world situation where we can use it, we are encouraged to rather than forbidden to.


And I try to take all this into account when teaching my Parkour classes to help give people not only the most useful training I possibly can, but also the most fun workout possible!